Tag Archives: ctmh

Sunshine and Warm Breezes Blog Hop

I am sure not all my readers have had a winter similar to mine but also know that many of you have- the cold was VERY cold and the snow just piled up and piled up and …. well, you get the idea! Now here I sit half way through March and spring should be in sight! I am hopeful that April will dawn with green grass and flowers pushing their way up through warm soil- ahhh!  For now seek some solitude in the ‘Sunshine and Warm Breezes’  Team Blog Hop where members of my team (the Brae-er’s) will each share  project on this theme that uses Close to my Heart products!

How does a hop work? Just read my blog, leave some love in the comments and click on the link at the bottom directing you to the next person in the hop!  Have fun!

miss you boat card

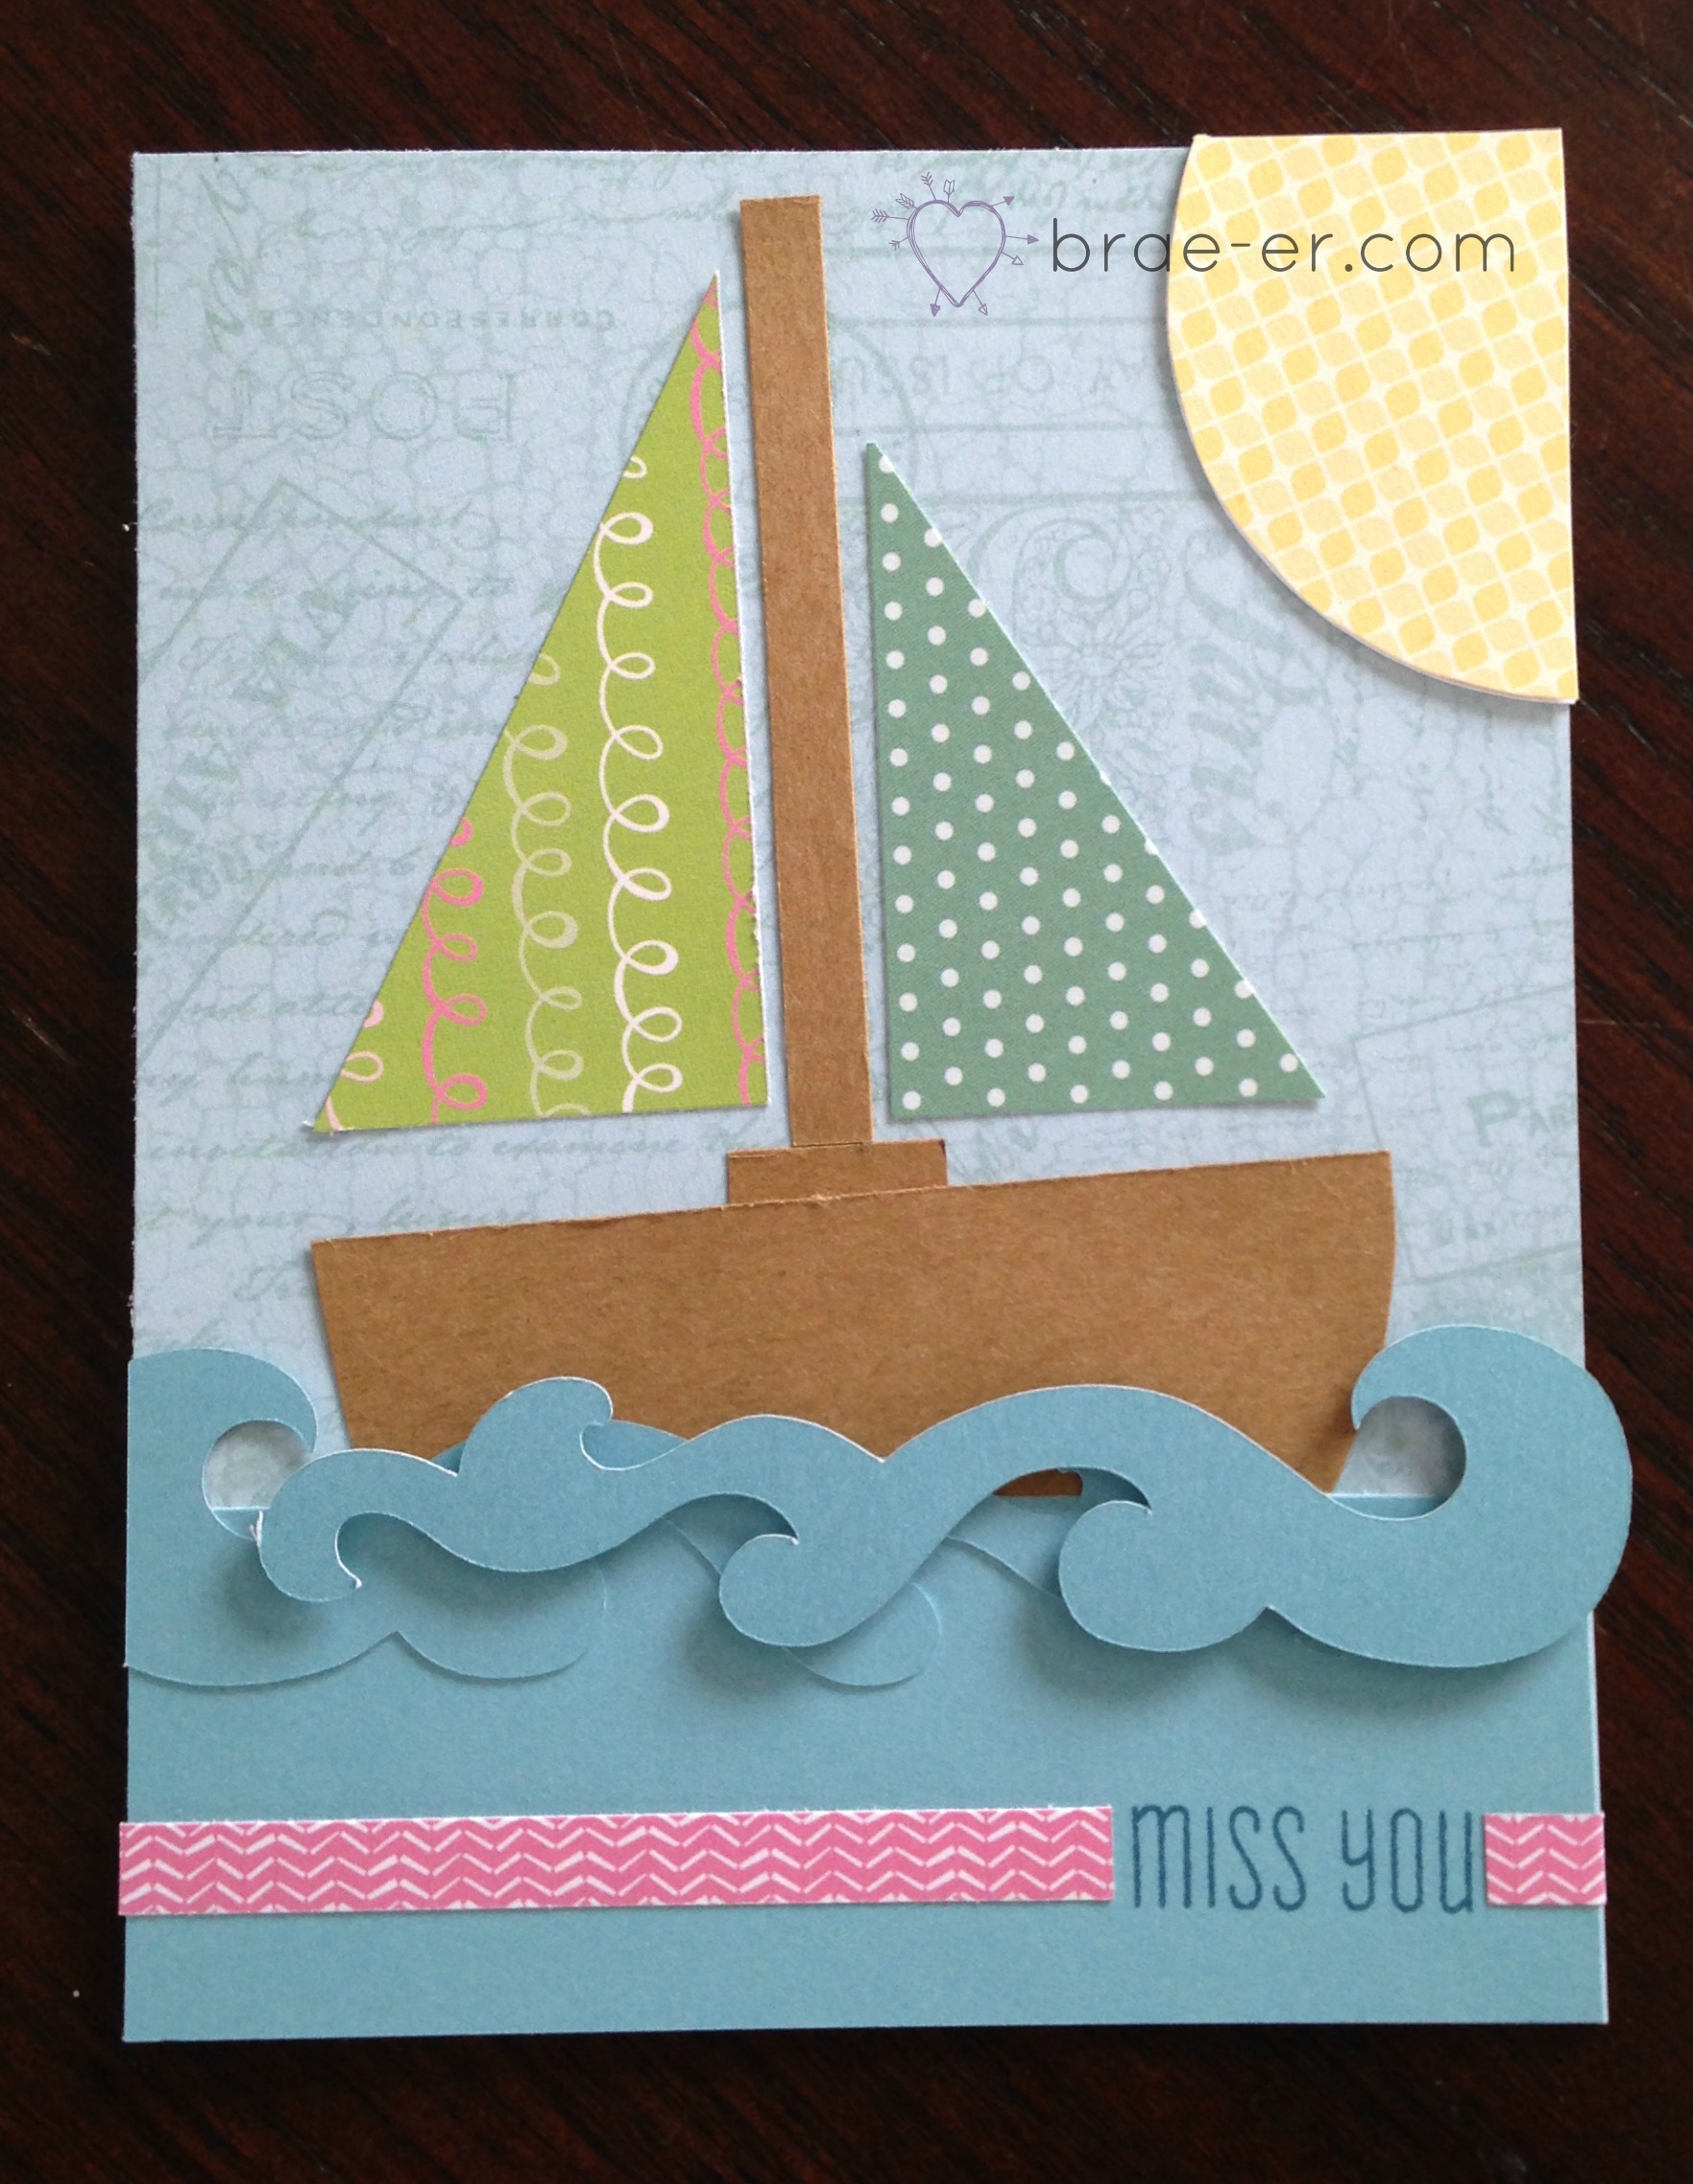
I love how this cute card turned out! I used a mix of papers from Lollydoodle and Balloon Ride- with some Kraft paper mixed in.  The card itself was very simple- I cut some triangles with my paper trimmer, the base of the boat is a circle cut in half and the waves are from the CTMH Cricut Artbooking cartridge.

Please subscribe to my blog while you are here ——> [widgets_on_ pagesid=”Subscribe!”]

Now hop on over to Lucy’s Blog to see what she has prepared (she has even been somewhere warm recently- how lucky is she!)

If you get lost the full list of hoppers is posted here:

1. Brae Montgomery- Here is my link: http://wp.me/p4htXJ-rP

3. Lucy Imrie- http://lucyscreativeexpressions.blogspot.ca/2014/03/sunshine-and-warm-breezes.html

4. Alyson Mayo – http://createwithalyson.blogspot.com/2014/03/unit-blog-hop-spring-card-box.html (permalink)

5. Michelle Stewart –http://mycreationswithmichelle.blogspot.com/2014/03/sunshine-and-warm-breezes-blog-hop.html

6. Arlene Bonsma – http://arlenescreativespace.blogspot.com/2014/03/sunshine-and-warm-breezes-march-blog-hop.html

7. Chris Robertson- http://chriscreativelife.blogspot.com/2014/03/sunshine-and-warm-breezes-march-blog-hop.html

8. Kimberly Clark – http://leokc34.blogspot.ca

9. Michelle Hughes – http://therighthugh.blogspot.com/2014/03/sunshine-blog-hop.html

10. Tamara Lisowski – http://geermara.blogspot.com/2014/03/ctmh-sunshine-and-warm-breezes-march.html

11.  Sheri Ballantyne — http://sherisays-justscrapit.blogspot.com/2014/03/the-brae-ers-sunshine-and-warm-breezes.html

12. Heather Steeves – http://paperplayroom.blogspot.ca/2014/03/sunshine-and-warm-breezes-march-team.html

Until we craft again, The Brae-er


Ivy Lane Overlay Layout

I love taking some of the artwork I see in the CTMH Idea Book and recreating it to work with my own taste and pictures!  I did that with this layout using our Ivy Lane paper and the Cricut Artbooking cartridge and you can see it all on my video! See below 🙂
ivy lane overlay layout

Until we craft again, The Brae-er


Jubilee Cards

In every Idea Book there is a paper pack that is my least favourite- Jubilee was that one for the Idea Book…. but, like every time, once I start to play with it I love it! The bright, warm colours work for so many things… like my two cards here that would not have been the same if I had not used the Jubilee paper!
jubilee friend card

For the first card I used the Jubilee paper, some bakers twines, epoxy bubbles and an upcoming stamp of the month for the sentiment.  I love how it turned out!
jubilee card with pop up

This card features a fun flower popped off the top and lots of scalloped edges! Jubilee paper, Jubilee compliments and some of our Green Chevron ribbon finish this card off!

Until we craft again, The Brae-er


Tuesday Technique: Paper Piecing

Welcome to another Tuesday Technique! This week we are looking at paper piecing!

Paper piecing is a great technique that can give your projects depth, texture and a look that elevates them above the everyday!  To paper piece you will select an image (and select carefully as images with many small parts may prove to be frustrating for your first experience) and stamp that image on a variety of papers.  Depending on the stamp image you may want to only use papers with a smaller pattern – this will ensure that your image fits and looks nice when complete.  Once you have stamped your images then you can cut out the individual pieces and glue them onto the base stamped image- in the case of my card here I paper pieced the owl and glued all my smaller pieces onto the blue body base.

Yes this can be a timely technique but believe me sometimes it is worth it!

owl card


If you try out one of the Tuesday Techniques I would love to see – feel free to use the ‘contact me’ tab to send me a picture of your art (I may just feature it on an upcoming blog post!)

Until we craft again, The Brae-er


Birthday Cards- two fun looks!

Can you even have enough birthday cards?! I don’t think so- it seems every time I create some then we have a whole bunch of family birthdays come up (not that they should be a surprise to me but somehow they are every year).  I made these two last weekend and have managed to hold onto the one but the other has already gone to brighten my sister-in-laws birthday!

happy bday hexagon card


The top card is a 6×6 card created with the Cricut Artbooking cartridge. I used the hexagon overlay and cut it out MANY times to create my white background (and on this one I left the inner hexagons in the overlay) AND to create the coloured hexagons to brighten my card.  The sentiment for the card also came of the Artbooking cartridge.  My ribbon banner was hand cut- just take a 1/2 inch strip of paper (I backed mine with some pink paper) and fold to get this look.    Aqua dots and flamingo dots were added for some more pop!  The paper featured is Lollydoodle.  I may try REALLY hard to never give this one away 🙂

happy bday kraft card


This card has a VERY different look- I used glitter paper, shimmer trim and Kraft paper for this one  The stamped image is from the ‘one-way borders’ and is stamped in white daisy ink on the kraft paper.  My centre image was cut on the cricut Art Philosophy.  I added some glitter gems and voila! I think this one is fun but a little distinguished- a more grown up look for a birthday card!

Do you handcraft your birthday cards?

Until we craft again, The Brae-er


Tuesday Technique : Spray Pen

Today we are going to look at the spray pen technique and using it for your cards and layouts!

Spray pens are fairly easy to use and we sell them in a convenient 3-pack- if you care for your pen then it will last you use after use! To care for it just make sure that you clean it after every use- storing any unused mixes in your pen could cause it to clog.

There are two recipes I use for making up a mix.

1. Re-inker and Pearl paint- mix a bit of water, a drop or two of re-inker and a very small amount of pearl paint in the barrel of your spray pen.  This mix will give your spray a pearly-sheen when it is dry.

2. Re-inker and water- mix a bit of water with a drop or two of re-inker.  Perfect for lots of different projects!
IMG_1002

Tips for using your spray pen:

try to keep a box around for using your spray in.  Place your project in the bottom of the box before spraying so that you do not end up decorating your entire table or room!

The first time you spray try it on a scrap piece of paper- holding your pens in different ways (or close or far away) will give your spray pattern different looks.  To ensure you get the one your like you will want to safely try it out ahead of time.

reinker screen shot   spray pen screen shot  pearl paint screen shot

Until we craft again, The Brae-er


Embossing with Ink using the CTMH Embossing Folders

Today I am going to share with you a new technique: Embossing with Ink! I am also going to share with you the Damask Folder we have- very pretty!!

Embossing with ink is a very simple technique and only requires you to have the embossing folder of your choice, some ink (I recommend our dye based ink for these projects as they are easier to clean up than the pigment) and your project paper.

emboss with ink 1


Open your folder and rub ink on the side of your choice- for my card I chose to rub the ink on the raised damask pattern (you will get a different look depending which side you use ink on so play around and have fun!)

Next, I placed the front of my card on the non-inked side so that I could get the placement just right- I didn’t want ink to get on my project until it was begin embossed.  This is how it looked before going through my Cuttlebug.

emboss with ink 2

and this is how it looked once embossed! All the ink is now IN the damask print- so pretty!!!


emboss with ink 3


Of course I finished this up with some cardstock that I sanded to soften the look- and a sentiment from the Lollydoodle complements!

emboss with ink 4


Screen Shot 2014-02-25 at 10.46.46 AM   Screen Shot 2014-02-25 at 10.47.01 AM   Screen Shot 2014-02-25 at 10.47.20 AM

Until we craft again, The Brae-er


Embossing- Sandpaper technique

Yesterday I showed a project using just plain embossing – of course there was nothing plain about the project itself!   Today I want to introduce you to the sanding technique.  Although this technique can be used even if you have not embossed it looks gorgeous when you have!  Emboss your paper as usual and then take some sandpaper or our sanding block and lightly sand over the raised areas- because our card stock has a white core this will reveal that.  It creates such a nice finish and can take plain cardstock and really bring it to life!

little lala layout


Here is a close up of the blue piece of paper that I used with the sanding technique.

Other items used on this page- Balloon Ride paper, grey glitter paper, clear epoxy bubbles.

little lala layout close up

See you tomorrow!


Until we craft again, The Brae-er


Embossing Folders

Yesterday I introduced you to the new embossing folders that CTMH has recently produced! Today I want to share some art with you using the embossing technique at its purest- just plain embossing.  I LOVE the look and the FEEL that embossing can give to a project.  In these cards I did the same thing for each- I placed the front of my card in the embossing folder (about 3/4 of the card front in the folder).  Once I placed the folder through the machine it came out with such a beautiful texture – this pattern is our ‘quatrefoil’- my FAV of all of them!

embossing card with bow

I then added a small strip of paper and a bow cut on the Cricut Artiste to finish of my card.  So simple and yet so pretty! So much so that I had to try it a bunch more times and with glitter paper- these are my new fav cards!!!

embossing trio cards


Tomorrow be sure to come back to see the sanding technique with embossing!

Until we craft again, The Brae-er


Embossing comes to Close to my Heart

Embossing has been around for years and like any aspect of Papercrafting it comes and goes with the trends- right now it is ON! Add to this that Close to my Heart is now offering a variety of  embossing folders and life is good!!

All this week I will be sharing different projects created with our folders- AND I will be sharing fun ways you can use these folders.  To start us off here is a video on our NEW embossing folders (all are available to purchase on my website and for the remainder of this week when you purchase two packs of card stock you get one embossing folder FREE).

Until we craft again, The Brae-er