Category Archives: Uncategorized

25 days of Handmade Gifts: Day 7, Reindeer Treat Cup Card

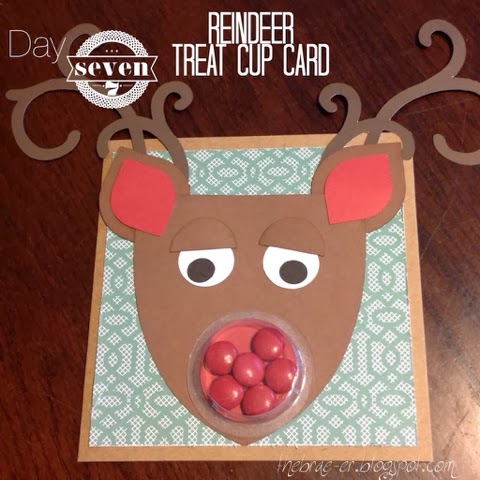
Yes! This is the cutest card EVER!!! My kids flipped out when they saw this card sitting on our counter. I think that shows that any kid would LOVE to receive this as a little gift or as a card accompanying a gift.  Want to know how to make this fun card- I used our CTMH Cricut Cartridges and a variety of ‘shapes’ to get him all together!

Face- I used chocolate cardstock. 
Artiste Cricut Cartridge
Accent 1 on page 48 cut at 4″

Ears- chocolate and ruby cardstock
Art Philosophy cartridge
Shape 11 on page 28- cut at 1 3/4″ for chocolate 
cut at 1 1/2″ for ruby

Nose- ruby cardstock
Art Philosophy cartridge
Circle 1 on page 21, 1 3/4″

Eyes- white, black and chocolate cardstock
Art Philosophy cartridge
Circle 1 on page 21, 1″ in white
Circle 1 on page 21, 1/2″ in black
Cirlce 1 on page 21, 11/4″ in chocolate and cut in half for eyelids

Antlers- cocoa cardstock
Artbooking cartridge
Icon page 57, cut fit to page (cut 2)
only use the antlers on these images

Piece your Rudolph as pictured above and add a treat cup for his nose- fill it with some yummy red candy! 


AND if you are on facebook be sure to ‘like’ my facebook page- there just might be a giveaway coming up!


Until we craft again, The Brae-er


25 Days of Handmade Gifts: Day 6, Personalized Journal

Welcome back! Today I want to share with you a personalized journal- so many people put their thoughts into some special place.  I have a almost-adult sister who is one of those people. This journal may be too mature for her taste but I have some ideas for that! To decorate this canvas journal (which I purchased off my website in the ‘while supplies last section’- check it out for some amazing deals!) I used our Huntington paper and one of the overlays from the Cricut Artbooking cartridge.  I cut the same image a few times on different paper so that I could piece together the tree- this tree is one of my favourite images on this cartridge!

I also stamped on the journal- for durability I used our pigment ink to do this.  Then I added a sparkle from the Rosewood mini-medley collection.  Easy, quick and a beautiful gift!!

What do I have in mind for my almost-adult sister? Well she is young and funky and full of life! She needs something that reflects that and for this reason I think I will be gifting her one of our Crush books and assortments for Christmas- it is much more reflective of her! Hope she likes it!


You can purchase these and more at 


Until we craft again, The Brae-er


Cross Canada Blog Hop- Holiday Gift Guide

Welcome to our November Blog Hop featuring creations made with products from the Mini Holiday With Heart Gift Guide.   To purchase any of the items seen in our blog hop today feel free to visit my website at braemontgomery.ctmh.com- we ship direct anywhere in Canada!
We hope that you will take the time to leave comments on our posts, as we love to get feedback from our viewers….whether it was something that you really liked or some new technique that was used that you would like to learn how to do….by leaving us comments, we get to hear what you like, and what you want to see. Thank you… now on to our hop! 
If you have just hopped onto my blog, you can start here as this is a circular hop.  If you came from Sheri of sherisays-justscrapit.blogspot.ca then you are in the right place!
This month I kept my project simple- a made a little 3×3 gift tag that can be attached to a holiday gift! I used the Remarkable Wreath stamp set, silver shimmer trim, Sparkle and shine washi tape (it makes my background paper) and a piece of ruby cardstock.  

If you want to see some of the BIGGER projects I have been working on this month then check back each day (and look back on my blog as well) as I have been running a 25 handmade gifts of Christmas blog event- lots of inspiration every day!


Your next stop on the Cross Canada Hop is Carol.

Thanks for hopping along with us – we hope we were able to inspire you to get creative using some of the designs, products and techniques seen along the way. Join us again in December when we will be featuring projects that would make great gifts.  We hope you will join us again on December 15th.

Until we craft again, The Brae-er


25 Days of Handmade Gifts: Day 5, Season’s Tweetings Gift Bags

Yes, if you have been following you may now see I bit of a theme to the last two days- I LOVE making gift bags.  They are a quick project that can be used in so many ways.  These ones I plan to fill with some of my yummy Christmas Cowboy Cookies! 

These bags came just a cute as you see them- what I created was the tags that adorn them.  I used the CTMH Cricut Art Philosophy cartridge for the tag and the Remarkable Wreath stamp set for the stamped images (stamped in chocolate, ruby and juniper).  I popped up my ‘4 you’ image with some of our foam tape but backed the image with some of our sparkle and shine washi tape OR some of our silver shimmer trim (love me some glitter!).  

How are you enjoying the handmade days? Have ideas for gifts that you would like to see? I would love to hear them- many of these days are planned far in advance but you may just catch me in time for me to create something new!

Are you on facebook? Be sure to like my facebook page to get lots of other fun updates, access to exclusive hostess rewards and chances to win prizes

 to order these featured products or others you have seen in this series

Until we craft again, The Brae-er


25 Days of Handmade Gifts: Day 4, Burlap Gift Bags

Welcome back!

Today I want to share some gift bags- we give so many gifts during the holiday season that need some cute packaging to really shine- gift cards are one very popular item that really should be packaged in a really cute way!
I did three different things on my bags:
1. Used CTMH alcohol marker in Ruby to colour the bottom of the burlap.  Closed the bag off with a length of our red chevron ribbon.
2. Used one of our chalkboard shapes and adhered it to the bag with liquid glass (I used this for everything as it is a very strong adhesive).  I then attached one of the pink felt flowers from the frosted assortment and two of the sparkles from the Black Base and Bling assortment.  
3. I used some of the pieces of the Rosewood mini medley- the flourish and two of the large sparkles- and added one of the grey felt flowers from the frosted assortment.

These are certainly going to make some of my gifts SHINE!!!

Order at 

Until we craft again, The Brae-er


25 Days of Handmade Gifts: Day 3, Holiday Home Decor

To me there is nothing better than seeing something really cute on etsy or Pinterest and re-creating it with stuff already in my house! This was actually inspired by a free printable I saw on Pinterest- yes printables are great but this… this is better!

Where do you find your inspiration? I would love to hear from you in the comments below!
To make this sign I used leftover wood from another home decor project I did for Halloween.  Originally I bought the piece of wood at Home Depot – it was a 6ft piece of pine that I had them cut into three pieces for me.  I think in total it was about ten dollars! I painted it red (thank you dollar store for my large supply of craft paint) and used my CTMH cricut cartridges to cut my letters.  For the fonts I used both the Art Philosophy and the Artbooking cartridges.  I also used Artbooking for the star and the swirl that makes my tree base.  

All of the glitter paper featured here is also sold by CTMH and me- we have a black/silver pack, shades of green pack and a brown/tan pack- I LOVE them all and go through way more than one person should!  I adhered all of the pieces down with our liquid glass.  

What do you think?

to shop!

Until we craft again, The Brae-er


25 Days of Handmade Gifts: Day 2, Snowman Napkin Rings

Today I bring you these cute (and secretly really easy) napkin rings! I created these using the Close to my Heart Artbooking Cricut cartridge- the snowman is one of the images that you can cut as is his hat, scarf and other features.  I used different papers so that I could have some colour variation to my snowman- orange for the carrot nose, kraft paper for his hat and arms and green glitter paper for his scarf and the ribbon on his hat (this I just free cut from the full hat as I knew I wanted to add that detail).  The eyes and buttons I decided not to glue on (too small) so I used the paper I had cut the image from as a stencil and used black marker to add those details.  To add the ring at the back I just cut some white cardstock 1×8 and glued the ends together- then glued them onto the back of my snowman- easy! 

You are going to see lots of our cricut cartridges and out glitter products in the next few days- they are easily some of my favourite product to use during the holidays!

Be sure to return tomorrow and if you would like to purchase any of these products visit my website at 

Until we craft again, The Brae-er


25 Days of Handmade Gifts: Day One, Sparkle and Shine Wreath

Welcome to my series on handmade gifts! I am very excited to share with you all the ideas I have had rolling around in my head since before Halloween. I am so excited for the holidays and all the gift giving opportunities it brings!

Be sure to ‘follow’ my blog and return back each day so you can be inspired for your holiday gifts!

This simple and very cute rag wreath is my first of our handmade gifts- personally I think I would be gifting this one to my own front door but maybe you are better than me at giving away what you make LOL!

To make this wreath I purchased a wire wreath base from my local scrapbook store.  I then used some of our fantastic fabric- here I used the Sparkle and Shine which features colours of Ruby, Juniper and Whisper- soft and yet ‘Christmas-y’.  I cut my fabric in 2 by 8 sections and then spent about an hour (while watching a movie) and knotted each piece onto the two center wire sections of the wreath.  In the end I used up three packs of our fabric in order to cover my whole wreath- that worked out to 9 fat quarters in total.  

As a gift this would be an excellent hostess present for any holiday parties you were to attend this season- the craft store had a smaller size that would be perfect for this use! 

You can purchase this product, and many other items featured in this series, at 

Until we craft again, The Brae-er


Picture YOUR life on my team!!!

There are really so many reasons to join Close to my Heart- it is a company that I feel really has the consultant in mind for everything they do! 

If you have been looking to join my team and manage your memories while making money and having fun then this is the month!!! When you join (for only $49) not only do you get a wonderful consultant kit full of $155 in product BUT when you place qualifying sales of at least $300 you will also recieve one of these NEW ‘Picture my Life’ scrapbooking kits! These have not even been released yet! Have the latest and the greatest from Close to my Heart!

Join at braemontgomery.ctmh.com!

Until we craft again, The Brae-er